Piping
The ‘Piping’ feature in REDCap allows you to inject previously collected data into text on a data collection form or survey, thus providing greater precision and control over question wording.
Where can Piping be used?
Piping can be used in many different places in REDCap. Below is a list of all the places where Piping may be utilized to insert a data value *INTO* text.
- Field Label
- Field Note
- Section Header
- Matrix field column headers
- Option labels for multiple choice fields (radio, drop-down, checkbox)
- Slider field labels (i.e. text displayed above slider bar)
- Custom record locking text (if defined, displayed at bottom of form)
- Survey Instructions
- Survey Completion Text
- Survey invitation emails (sent via Participant List or Automated Invitations) – includes both subject and message
- Custom text displayed at top of Survey Queue
- Inside the URL for a survey’s ‘Redirect to a URL’ setting
- Inside the @DEFAULT action tag
From what field types can data be piped?
Data can be piped into the locations listed above *FROM* any type of field in REDCap. If you are piping the answer *FROM* a multiple choice field (e.g., radio, drop-down), by default it will display the option label (not the coded data value) into the location where the field is piped, but for all other field types, it will pipe the literal data value. See below how to append ‘:value’ to the variable name inside brackets to pipe the value (instead of the label) for multiple choice fields. Also see below how to pipe data from checkbox fields, which is slightly different than with other field types.
How do I utilize Piping?
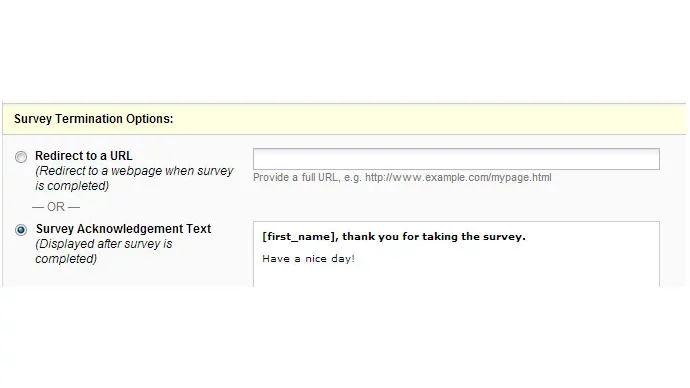
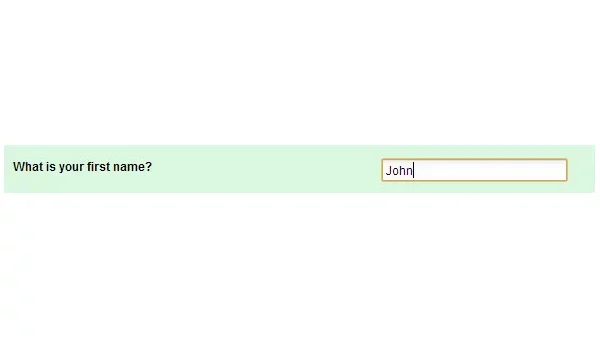
Setting up Piping is very simple. Piping does *not* have to be enabled in any way in order to use it. All you need to do to pipe a data value into any of the valid places listed above is insert into your text the variable name inside square brackets. For example, if we have a survey question that asks ‘What is your first name?’, in which the variable name for that question is ‘first_name’, then the following question may be set up as ‘[first_name], what is your date of birth?’. If the user entered ‘John’ as their first name, then text for the next question would literally read as ‘John, what is your date of birth?’. In the same way, you could use [first_name] in your survey’s survey completion text when the survey is completed, in which ‘Thanks for taking our survey, [first_name]!’ would be displayed to the respondent as ‘Thanks for taking our survey, John!’.
If you are piping the answer *FROM* a multiple choice field (radio, drop-down), it will display the option label (not the coded data value) into the location where the field is piped. For example, if you had a drop-down question that said ‘What is your favorite ice cream?’ with the choices ‘Chocolate’, ‘Vanilla’, and ‘Strawberry’ (all coded as 0, 1, 2, respectively), then after selecting ‘Chocolate’, the next question would read ‘On a scale of 1 to 10, how much to you like Chocolate?’. But for non-multiple choice fields, such as Text, Notes, Slider fields, it will pipe the literal data value. If you wish to pipe the value (not the label) of a multiple choice field, append ‘:value’ to the variable name inside brackets – e.g., [race:value]. Note: The usage of ‘:value’ must be used if piping inside the @DEFAULT Action Tag if you would like to pipe the value of a multiple choice field as the default value of a field.
If you have a longitudinal project, you may utilize cross-event Piping if you wish. In the same way that cross-event calculations and branching logic are set up, you simply prepend the variable name inside square brackets with the unique event name inside square brackets. For example, if you collected a person’s first name on the event named ‘Enrollment’, which has the unique event name ‘enrollment_arm_1’, then you could set up piping as ‘[enrollment_arm_1][first_name], what is your date of birth?’. Thus it will pipe the first name value only from the ‘Enrollment’ event and not any other event, whereas if the unique event name is not prepended to a variable in a longitudinal project, it will pipe the data value from the current event.
Piping from Checkbox fields
Piping from Checkbox fields is slightly different than with other field types because checkboxes allow for multiple saved values. There are options to display a list of checked choices, unchecked choices, or a specific choice.
- [my_checkbox:checked] – Appending ‘:checked’ will display a comma-delimited list of choice labels that have been checked – e.g., ‘Sunday, Tuesday, Thursday’. Note: If neither ‘:checked’ nor ‘:unchecked’ is appended to the variable, then it will default to ‘:checked’.
- [my_checkbox:unchecked] – Appending ‘:unchecked’ will display a comma-delimited list of choice labels that have NOT been checked – e.g., ‘Monday, Wednesday, Friday, Saturday’.
- [my_checkbox(code)] – If a coded value of the checkbox is included inside parentheses after the variable name – e.g., [my_checkbox:(2)] – then it will output the word ‘Checked’ or ‘Unchecked’ regarding whether or not that specific choice has been checked off.
Please note that while the checkbox piping options listed above will return the text labels, you may also append ‘:value’ to the variable to return the raw value instead of the label. For example, [my_checkbox:checked:value] and [my_checkbox:unchecked:value] might return ‘1, 3, 5’ and ‘2, 4, 6, 7’, respectively, and [my_checkbox(2):value] will return 1 or 0 if checked or not checked, respectively.
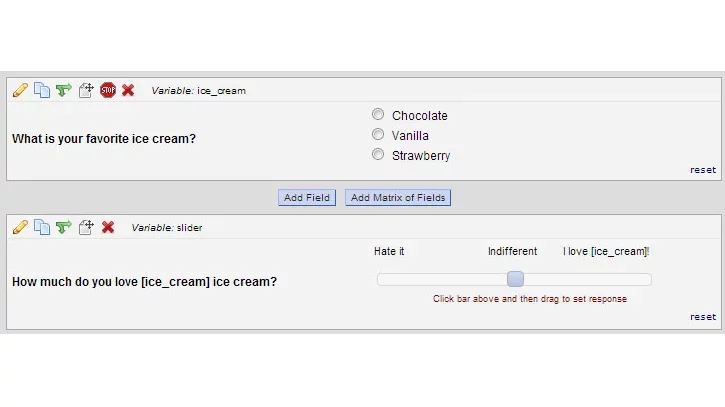
EXAMPLE 1
Setup:
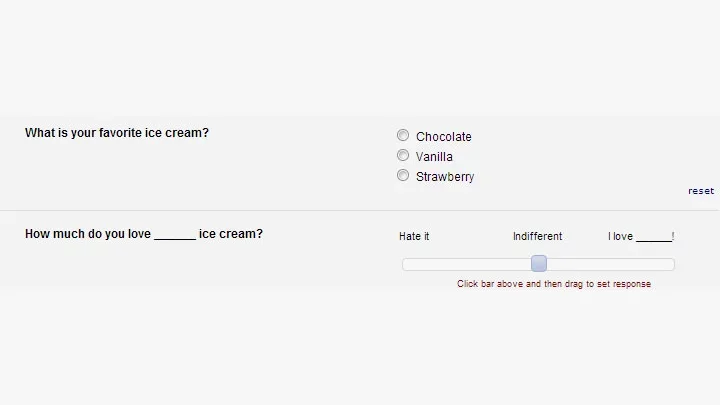
Before:
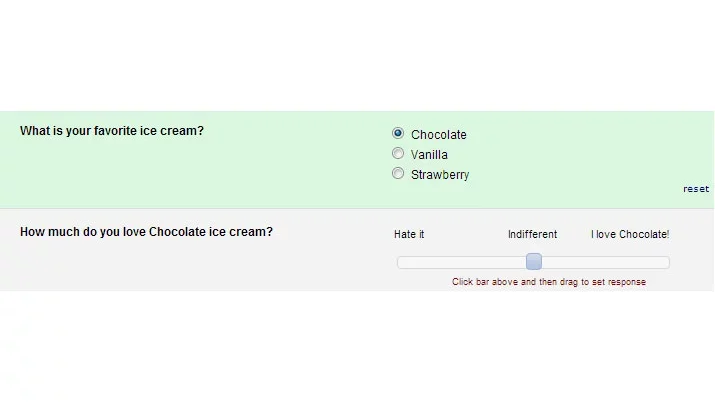
After:
EXAMPLE 2
Setup:
Before:
After: